I have had the opportunity to see many MVC projects and in the vast majority of them I find structures where the view models are manually validated in all the methods of all the controllers.
At best, the code relies on verifying ModelState property from Controller class, but in the worst case… better not to comment it.
[Route("")]
[HttpPost]
public async Task<IActionResult> CreatePostAsync([FromBody] CreatePost request)
{
    if (ModelState.IsValid)
    {
        return Ok(await _postService.CreateAsync(request));
    }
    return BadRequest(ModelState.ValidationState);
}
So, it exists a more elegant solution for this… let’s see it
In our example, we will validate a view model called CreatePost before the request reaches the controller PostController, and after that, we will send the request to properly service
Step 1: Install nuget packages
Download FluentValidation.AspNetCore by Jeremy Skinner
Step 2: Create validator
With FluentValidation package, all our validators are classes that inherits from AbstractValidator, where is our view model.
In this step, we’re making sure that the “Title” and “Content” properties from “CreatePost” view model are never empty, like [Required] data annotation.
public class CreatePostValidator : AbstractValidator<CreatePost>
{
    public CreatePostValidator()
    {
        RuleFor(x => x.Title).NotEmpty();
        RuleFor(x => x.Content).NotEmpty();
    }
}
As you can see, in class constructor, you can add rules for each property and combine as you need.
This is a more complete example with conditional rules for a more flexible scenario, where we can allow authentication with a username or email, but always one of the two.
public class LoginValidator : AbstractValidator<Login>
{
    public LoginValidator()
    {
        RuleFor(x => x.UserName)
            .NotEmpty()
            .When(x => !DataTypesHelper.IsEmail(x.Email) && string.IsNullOrEmpty(x.Email))
            .WithMessage("Username or email are required");

        RuleFor(x => x.Email)
            .NotEmpty()
            .When(x => string.IsNullOrEmpty(x.UserName))
            .WithMessage("Username or email are required");

        RuleFor(x => x.Password)
            .NotEmpty()
            .WithMessage("Password is required");
    }
}
If you need, you can read the complete documentation about FluentValidation from Github repository
Step 3: Create MVC filter
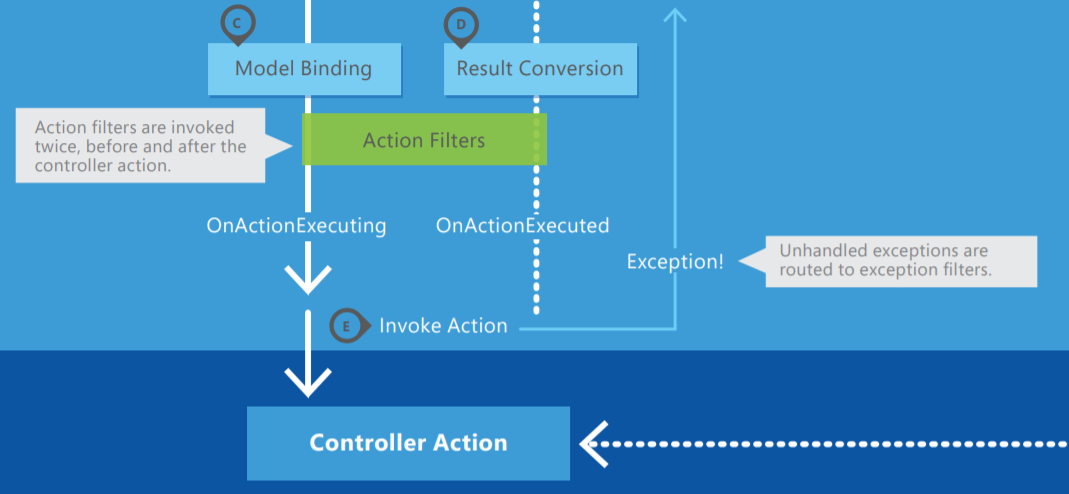
As shown on this post about MVC lifecycle by Matthew Jones, Action Filters are invoked before and after controller, but we are interested in validating our model only before invoking the controller, so for this reason we will use OnActionExecuting method.
At this point, we will check ModelState, which internally will apply the rules that we have defined with FluentValidation
public class ModelStateFilter : IActionFilter
{
    public void OnActionExecuting(ActionExecutingContext context)
    {
        if (!context.ModelState.IsValid)
        {
            context.Result = new BadRequestObjectResult(context.ModelState);
        }
    }
    public void OnActionExecuted(ActionExecutedContext context) { }
}
Code example is based on this Gist
Step 4: Register services into DI container
When adding the MVC service to the DI container, we must specify the action filters that we want to use, and then, specify in which assembly are the validators of our view models.
public void ConfigureServices(IServiceCollection services)
{
    services.AddMvc(options =>
        {
            options.Filters.Add(new ModelStateFilter());
        })
        .AddFluentValidation(options =>
        {
            options.RegisterValidatorsFromAssemblyContaining<Startup>();
        });
}
Step 5: Create controller method
The last step is to create a method in our controller, which meets the requirement of being lightweight.
[Route("")]
[HttpPost]
public async Task<IActionResult> CreatePostAsync([FromBody] CreatePost request)
{
    return Ok(await _postService.CreateAsync(request));
}
If you invoke the method with the wrong view model, you will receive a response like “400 Bad Request” with the errors summary.
POST /post HTTP/1.1
Host: localhost:50555
Content-Type: application/json
Cache-Control: no-cache
Postman-Token: c5f7b803-dfe2-a315-eb8f-671b84cb3175

{
	"Title": "",
	"Content": "",
	"Excerpt": ""
}
And JSON response should be like:
{
    "Title": [
        "'Title' should not be empty."
    ],
    "Content": [
        "'Content' should not be empty."
    ]
}